WP Minimalist Premium Theme Documentation
- Getting Started
- Installation
- License Integration
- Demo Import
- Site Identity
- Site Title Colors & Typography
- Global Options
- Header Media
- Theme Header
- Main Banner
- Featured Links
- Blog Page / Archive
- Latest Products
- Innerpages
- Colors
- Single Post
- Footer Three Column
- Footer Newsletter
- Footer Instagram
- Theme Footer
- WooCommerce
- Footer Copyright Text
- Translation
Getting Started
Installation
- Log in to your WordPress Administration Panel.
- Click on Appearance -> Themes -> Add New
- Search for “WP Minimalist” in the search field.
- You can upload the theme zip file if you have downloaded before.
- Click on Install button and then Activate the theme.

Pro Version
Buy WP Minimalist premium version from the blazethemes store you will get email once your purchase is completed. Download the theme zip from the link given in the email or download the latest version of the theme from “My Account” page
- Log in to your WordPress Administration Panel.
- Click on Appearance -> Themes -> Add New
- Upload the theme zip file that you have downloaded.
- Click on Install button and then Activate the theme.

- Unzip the downloaded zip file.
- Upload the unzipped file inside public_html/wp-content/themes/.
- Now, activate the theme through Dashboard > Appearance -> Themes
- Activate the WP Minimalist and Click on “Customize” in the Appearance Menu in the Dashboard. Now you can customize or modify according to your choice.
Pro Version
Buy WP Minimalist premium version from the blazethemes store you will get email once your purchase is completed. Download the theme zip from the link given in the email or download the latest version of the theme from “My Account” page
- Unzip the downloaded zip file.
- Upload the unzipped file inside public_html/wp-content/themes/.
- Now, activate the theme through Dashboard > Appearance -> Themes
- Activate the WP Minimalist Pro and Click on “Customize” in the Appearance Menu in the Dashboard. Now you can customize or modify according to your choice.
License Integration
Pro Version
You need to activate the license key in order to receive Automatic Theme Updates which includes featured updates, security updates and bug fixes. To activate the license key,
- First you have to find the license key that you will get in your purchase confirmation email.
- You can also find your license key in “My Account” page of blazethemes.com
- Now, go through your dashboard > appearance > WP Minimalist License
- Paste the license key in the input field and click “Activate License”

Demo Import
After you activate WP Minimalist in your website. You can use demo import to make your site look like one of our available demos.
- Go to Appearance > WP Minimalist Info
- You can see list of all demos in this page
- If you have not install/activate the Blazethemes Demo Importer plugin Click on install/activate demo importer button just above the demos listing section

- Then, hover onto the demo you want to import and Click Install
- It will land you to the demo importer setting page
- Check the box if you want to reset your website data before demo import( Note : It will erase all of your posts, pages, media and website data )
- Uncheck box if you do not want to erase your previous data. ( Note : Your site may not look exactly like demo as your previous posts, pages, categories or tags may collide with new data )
- Final Note: Always backup your website before resetting website for demo import.
- Finally, your site now looks exactly like a demo. Go on and Customize further with your choice

Site Identity
To upload and change site logo & Site Icon
- Dashboard > Appearance > Customize > Site Identity > Logo & Site Icon
- Upload the logo and site icon you want to set for your site.
- Upload the logo for site icon as recommended it should be square and at least 512 * 512 pixels.

To change site title & tagline
- Dashboard > Appearance > Customize > Site Identity > Site title & Tagline
- Under Site title input field add your site title
- Uncheck to hide site title under “Display site title” checkbox field
- Under Site title input field add your site description
- Uncheck to hide site title under “Display site description” checkbox field

Site Title Colors & Typography
To change site title colors and typography
- Dashboard > Appearance > Customize > Site Identity > Site title & Tagline
- Scroll to style section
- Choose the site title color
- Choose the site title hover color
- Scroll to typography section
- Choose font family, font weight, font style, font size and line height

Global Options
To work on Miscs
- Dashboard > Appearance > Customize > Global Option > Miscs

Pro Theme
To work on Site Preloader
- Dashboard > Appearance > Customize > Global Option > Site Preloader
- Toggle to enable preloader
- Choose background color
- Choose image or a gif to load before site content loads

Pro Theme
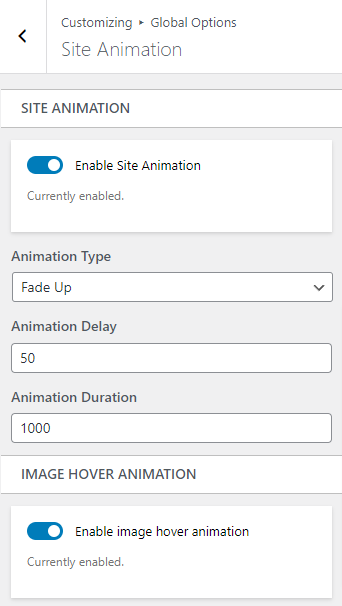
To work on Site Animation
- Dashboard > Appearance > Customize > Global Option > Site Animation
- Toggle to enable site animation
- Choose animation type from dropdown
- Choose animation delay
- Choose animation duration
- Toggle to enable image hover animation
To work on Sticky Header
- Dashboard > Appearance > Customize > Global Option > Sticky Header
- Toggle to show sticky header

To work on Social Share
- Dashboard > Appearance > Customize > Global Option > Social Share
- Show / hide twitter share
- Show/ hide facebook share
- Show / hide pinterest share
- Show / hide linkedin share
- Toggle to show social share on archive
- Select display social share html on
- Toggle to show social share on single page

To work on Container
- Dashboard > Appearance > Customize > Global Option > Container
- Change container width and sidebar width

Pro Theme
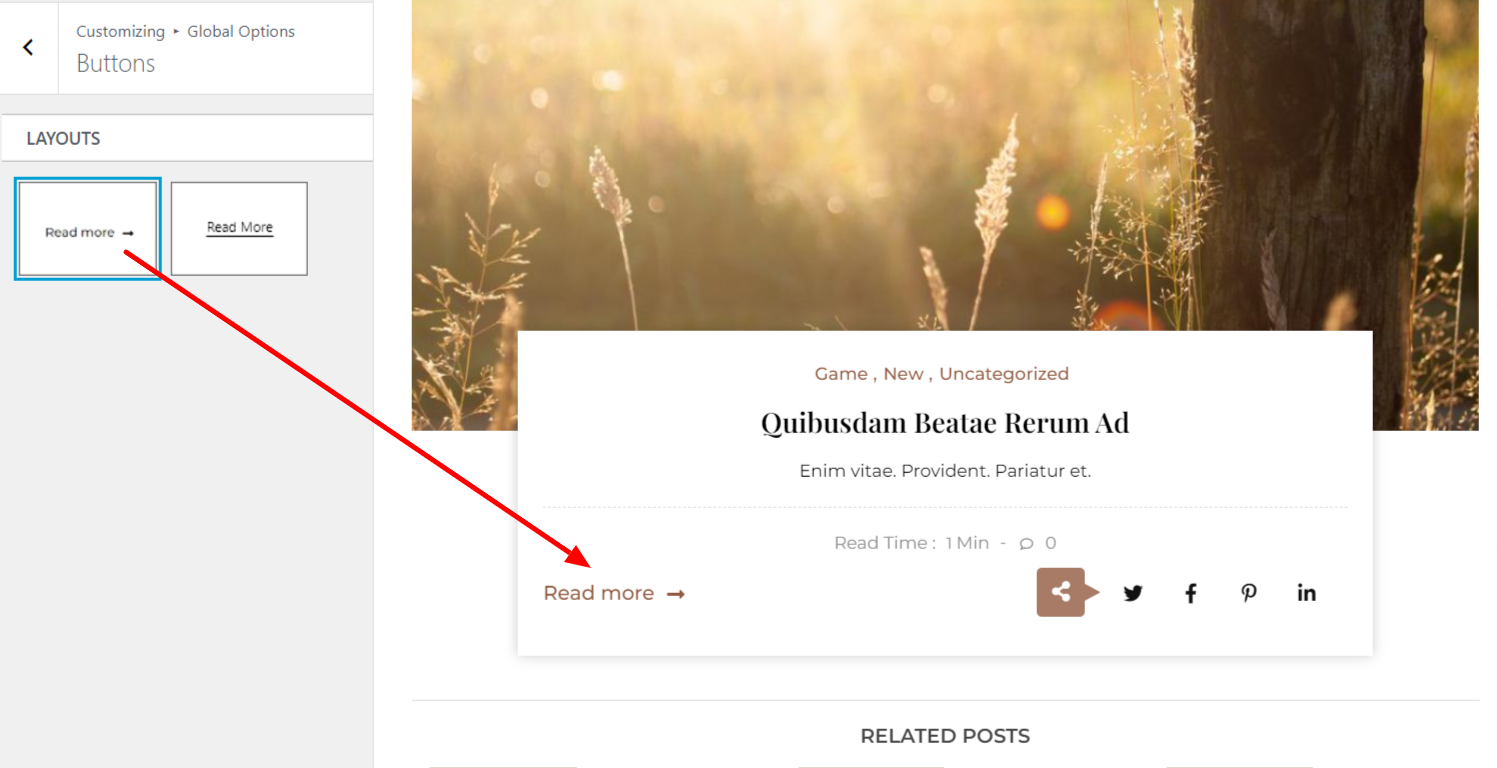
To work on Buttons
- Dashboard > Appearance > Customize > Global Option > Buttons
- Choose buttons layouts
Pro Theme
To work on Breadcrumb
- Dashboard > Appearance > Customize > Global Option > Breadcrumb
- Toggle to show / hide breadcrumb
- Select prefix title
- Select home title
- Select search page title
- Select error 404 title

To work on Sidebar Layouts
- Dashboard > Appearance > Customize > Global Option > Sidebar Layouts
- Change post sidebar, page sidebar, archive/category sidebar, search page sidebar, 404 page sidebar

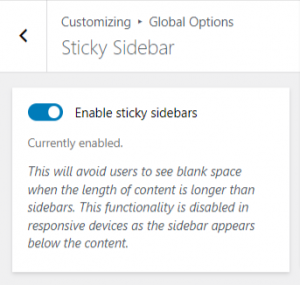
To work on Sticky Sidebar
- Dashboard > Appearance > Customize > Global Option > Sticky Sidebar
- Toggle to enable sticky sidebars
To work on Scroll To Top
- Dashboard > Appearance > Customize > Global Option > Scroll To top
- Toggle to show scroll to top
- Show button on mobile and tablet from checkbox
- Choose button align
- Customize padding from padding section
- Choose border style, border color, border width from border section

Pro Theme
- Select buttons text or leave blank to hide text
- Choose color / hover color
- Choose background – color / hover

Pro Theme
To work on Typography
- Dashboard > Appearance > Customize > Global Option > Typography
- Choose font family, font weight, font style, font color, font size, line height
- Click on custom to see changes you made here. Theme default will revert typography to the default values generated by theme

Header Media
To work on Header Media
- Dashboard > Appearance > Customize > Header Media
- Select header video or enter a youtube URL
- Select header image

Theme Header
To work on Content
- Dashboard > Appearance > Customize > Theme Header > Content
- Toggle to show search bar
- Select search placeholder
- Choose search bar color / hover color
- Toggle to show sidebar toggle bar
- Choose sidebar toggle color / hover color
- Toggle to show social icons
- Choose social icons color / hover color

To work on Style
- Dashboard > Appearance > Customize > Theme Header > Style
- choose background to solid, gradient and image

Pro Theme
- Choose header layouts
- Choose bottom box shadow from dropdown
- Select header margin bottom

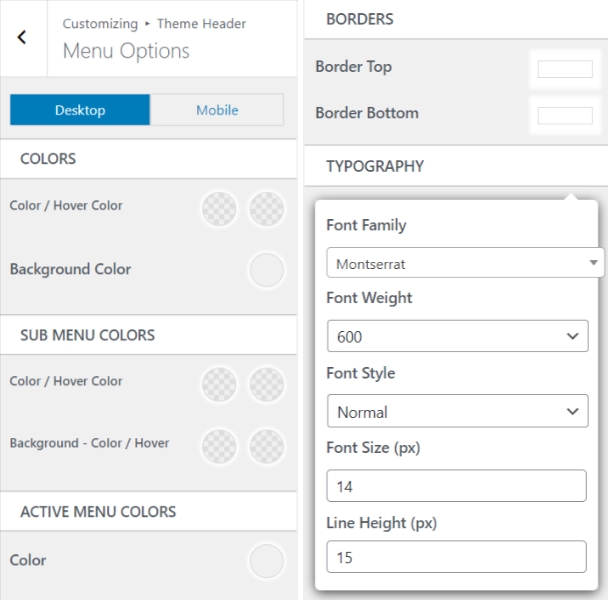
To work on Menu Options
- Dashboard > Appearance > Customize > Theme Header > Menu Options
- Select menu color / hover color
- Select sub menu color / hover color
- Select active color
- Select to show border top
- Choose font family, font weight, font style, font size and line height from typography section
- Click on “Mobile” tab to change the mobile menu toggle button color and background color

Pro Theme
- Select menu background color
- Select sub menu background color / hover
- Select to show border bottom
Main Banner
To work on main banner
- Dashboard > Appearance > Customize > Main Banner
- Toggle to show / hide main banner
- Select orderby to show main banner in different pages from drop down
- Change banner source
- Select orderby to display the post in different order
- Select posts categories from checkbox
- Choose number of posts to display
- show/hide post title
- show/hide post categories
- show/hide post published date
- show/hide comments number
- Show slider controller arrows
- Show slider page dots
- Enable slider loop
- Enable fade animation
- Control slider speed

Pro Theme
- Choose available layouts for main banner
- Enable slider item to auto slide

Featured Links
To work on Featured Links
- Dashboard > Appearance > Customize > Featured Links
- Toggle to show / hide featured links
- Select orderby to show featured links in different pages from drop down
- Choose section title
- Choose content type from dropdown
- Choose post categories from checkbox
- Toggle to show/hide links title and categories count
- Select column control

Pro Theme
- Choose available layouts for featured links
- Show/hide carousel control arrows
- Enable carousel auto

Blog Page / Archive
To work on Blog Page / Archive
- Dashboard > Appearance > Customize > Blog Page / Archive
- Choose Posts layouts
- Choose post content to display
- Show / hide post date, post comments number, post categories, read more from checkbox
- Select read more text
- Toggle to show / hide related posts
- Choose related posts title and posts count

Pro Theme
- Select pagination type from dropdown
- Select word count
- Show / hide dotted line separator
- Show / hide read time from check box
- Choose read time text
- Select filter posts by
- Show / hide related post content
- Show / hide section on mobile and tablet
- Show / hide related post image

Latest Products
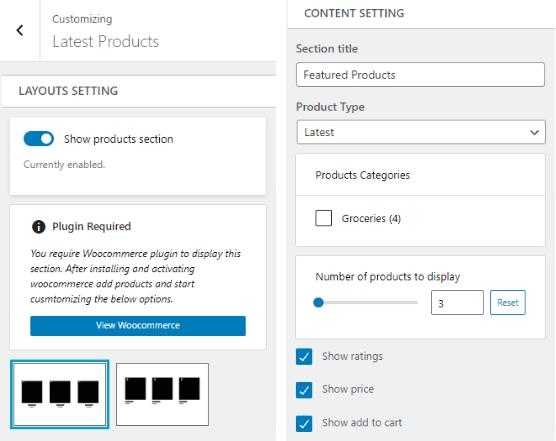
To work on Latest Products
- Dashboard > Appearance > Customize > Latest Products
- Toggle to show / hide latest products
- Install and activate the related plugin
- Choose section title
- Choose product type from dropdown
- Choose number of products to display
- Show/hide ratings
- Show/hide price
- Sow/hide add to cart

Pro Theme
- Choose available layouts for latest products
- Choose products categories from checkbox
Innerpages
Pro Theme
To work on Search
- Dashboard > Appearance > Customize > Innerpages > Search
- Choose search title
- Choose search content

Pro Theme
To work on 404 Error Page
- Dashboard > Appearance > Customize > Innerpages > 404
- Select image
- Select 404 page title
- Select 404 content title
- Choose label, URL from button section
- Choose button color/hover color, Background-color/hover

Colors
To work on Colors
- Dashboard > Appearance > Customize > Colors
- Choose background color, theme color, theme hover color, Slider BK color

Single Post
To work on Single post
- Dashboard > Appearance > Customize > Single post
- Show/hide post date
- Show/hide post categories
- Show/hide post comments number
- Show/hide post tags
- Toggle to show/hide author box
- Choose related posts title
- Choose posts count

Pro Theme
- Choose post layouts
- Toggle to show/hide related posts
- Toggle to show posts in Popup
- Choose filter posts by

Footer Three Column
To work on Footer Three Column
- Dashboard > Appearance > Customize > Footer Three Column
- Choose column title and post category from column one section, column two section and column three section
- Choose section width
- Select to show section in different pages
- Customize padding from padding section
- Choose color / hover color
- choose background to solid and gradient

Pro Theme
- Choose column title, posts count and post category from column one section, column two section and column three section

Footer Newsletter
Pro Theme
To work on Footer Newsletter
- Dashboard > Appearance > Customize > Footer Newsletter
- Install and activate the related plugin
- Choose title and sub title
- Paste newsletter shortcode
- Choose section width from dropdown
- Select to show section in different pages
- Control padding from padding section
- Choose color / hover color
- Choose background solid or gradient

Footer Instagram
Pro Theme
To work on Footer Instagram
- Dashboard > Appearance > Customize > Footer Instagram
- Install and activate the related plugin
- Paste Instagram shortcode
- Choose section width from dropdown
- Show section in different pages
- Control padding from padding section
- Choose background solid or gradient

Theme Footer
To work on Content
- Dashboard > Appearance > Customize > Theme Footer > Content
- Toggle to enable footer section
- Select to manage footer widget

To work on Style
- Dashboard > Appearance > Customize > Theme Footer > Style
- Select footer width from dropdown
- Choose footer layout
- Change text color / hover color

Pro Theme
- Choose background setting to solid, gradient and image

To work on Bottom Footer
- Dashboard > Appearance > Customize > Theme Footer > Bottom Footer
- Change copyright text

Pro Theme
- Toggle to enable footer
- Choose text color / hover color
- Choose background to solid and gradient

WooCommerce
To work on Store Notice
- Dashboard > Appearance > Customize > WooCommerce > Store Notice
- Enable store notice from checkbox

To work on Product Catalog
- Dashboard > Appearance > Customize > WooCommerce > Product Catalog
- Choose shop page display from dropdown
- Choose category display from dropdown
- Choose default product sorting from dropdown
- Choose products per row from dropdown
- Choose rows per page

To work on Product Images
- Dashboard > Appearance > Customize > WooCommerce > Product Images
- Choose main image width
- Choose thumbnail width
- Choose thumbnail cropping, custom or uncropped option

To work on Checkout
- Dashboard > Appearance > Customize > WooCommerce > Checkout
- Choose company name from dropdown
- Choose address line 2 field from dropdown
- Choose phone from dropdown
- Highlight required fields from checkbox
- Choose privacy policy page from dropdown
- Choose terms and conditions page from dropdown

Footer Copyright Text
Pro Theme
To change footer copyright string
- Go through Dashboard > Appearance > Customize > Theme Footer > Bottom Footer
- Under Site information editor field change the string

Translation
To translate The Styled Blog theme in your language
- Activate “Loco Translate” Plugin from Dashboard > Plugins > Add new > Search for Loco Translate
- Install & Active the plugin
- Now go to Loco Translate in your dashboard left admin menu
- Click on active theme
- Choose the language you want to translate to
- Then add string of your language

To work on Social
Pro Theme